ENERGY EFFICIENT HOUSING
This was one of our lengthy projects; it took about four weeks, maybe even longer.
In this project, we had several mini-projects which eventually led up to one goal: how to create an energy efficient house that is comfortable without using electricity to heat and cool it [the home]. I am going to explain all the projects we have done below.
SOLAR WATER HEATER
This was our very first project. We had to build a solar water heater that could hold 1 liter of water. We learned about radiation (how the sun's rays move through space), convection (how heat is transferred through water), and conduction (when heat travels through a solid object/material). We designed and built a water heater using several household materials: 2 ft. of plastic tubing, 3 ft. of soft copper tubing, a shoebox, saran wrap, aluminum foil, a water container, and some sort of insulation to keep the water warm.
Unlike the other designs, we omit the water container to hold the water. We decided to have our water heater itself to hold the water, and to let the water sit in the heater until it was warm enough. Here was our building process:
1.) We took a shoebox and place one layer of cotton balls (our insulation to keep the water warm) on the bottom.
2.) We cut six holes in the box, all in a lower level than the previous hole, in a zig-zag pattern.
3.) We covered the inside of the shoebox with a layer of aluminum foil, and on top of the cotton ball insulation. This was to help reflect the light and heat onto the copper tubing, in which I will explain of below.
4.) We placed three pieces of copper tubing in the holes that we cut in the box in a shape of a "z".
5.) We cut small pieces of the plastic tubing and connected them to the copper tubing. To prevent leakage, we placed clay on the places where the plastic and copper met.
6.) We covered the top of the shoebox in a sheet of saran wrap to create a greenhouse effect, and the lid of the shoebox in a sheet of aluminum foil to reflect the light of the sun on the tubing.
7.) We taped the lid at a 68 degree angle, so it was tilted towards the sun.
After testing our heater, my group found out that we gained 12 degrees from our initial temperature, which was very surprising. Our design's heat gain was a total of 6,279 Joules.
SOLAR ANGLES
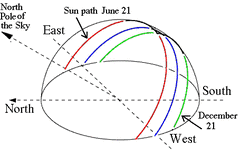
This was the next thing that we learned. Everyone in our class knew that the sun changed positions throughout the day, depending on what time it was. But for the majority of us, it was new information that the sun changed its height in the sky during different seasons due to the earth's tilt. The sun is lower in the sky during the winter than it is in the summer. That is why the sun and its light are "weaker" during the colder months. On the left is a chart showing the sun's movements.
DAYLIGHTING DESIGN ACTIVITY
In this project, we learned about different ways to get light without electricity in a house. We had to design a 1,000 square ft. house using at least one of each of the following daylighting techniques:
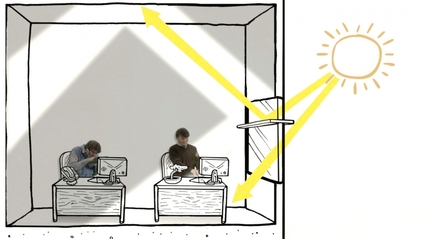
1.) Skylights~ skylights are like giant windows on the roof of a house.This is an awesome technique to get lots of light in a room, especially at noon, when the sun is in the middle of the sky.
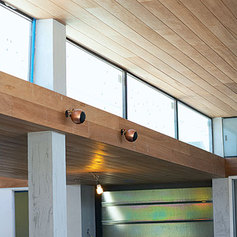
2.) Light Shelves~ these look like shelves on a window, and they reflect and distribute light from outside to the home's ceiling. They also are good at reducing glare.
3.) Clerestory Windows~ clerestory windows are placed high up on the side of a wall, and is good at catching light in the morning, or just before sunset.
4.) Solar Tubes~ these are giant tubes/pipes placed into a roof onto the home's ceiling. It catches natural light and distributes it around the room. It is made of reflective material for this reason.
We first designed a house with 60-watt light bulbs and decided how many to put in each room in our house, and how often they were on. We calculated the energy consumption, and found that we used 23 bulbs total with an average of 19 hours per day of operation. The total energy consumption was 8.28 kilowatts per hour.
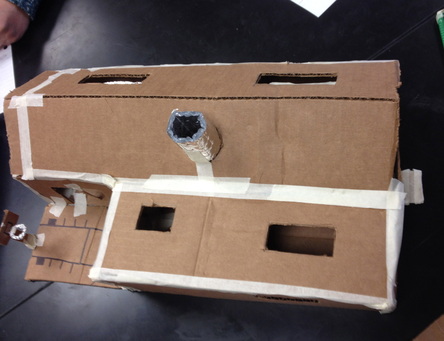
We then designed a to-scale model of a house (mentioned above) with no use of light bulbs, but with the use of the daylighting techniques mentioned above and pictured below. After testing it, we decided to still have bulbs, but with a minimal amount. We came up with the use of 15 bulbs, with an average of 14 hours per day of operation. We got an energy consumption of 6.21 kilowatts per hour, which was 2.07 kilowatts per hours less than before.
Below is a picture of our house, and of all the daylighting examples.
This was one of our lengthy projects; it took about four weeks, maybe even longer.
In this project, we had several mini-projects which eventually led up to one goal: how to create an energy efficient house that is comfortable without using electricity to heat and cool it [the home]. I am going to explain all the projects we have done below.
SOLAR WATER HEATER
This was our very first project. We had to build a solar water heater that could hold 1 liter of water. We learned about radiation (how the sun's rays move through space), convection (how heat is transferred through water), and conduction (when heat travels through a solid object/material). We designed and built a water heater using several household materials: 2 ft. of plastic tubing, 3 ft. of soft copper tubing, a shoebox, saran wrap, aluminum foil, a water container, and some sort of insulation to keep the water warm.
Unlike the other designs, we omit the water container to hold the water. We decided to have our water heater itself to hold the water, and to let the water sit in the heater until it was warm enough. Here was our building process:
1.) We took a shoebox and place one layer of cotton balls (our insulation to keep the water warm) on the bottom.
2.) We cut six holes in the box, all in a lower level than the previous hole, in a zig-zag pattern.
3.) We covered the inside of the shoebox with a layer of aluminum foil, and on top of the cotton ball insulation. This was to help reflect the light and heat onto the copper tubing, in which I will explain of below.
4.) We placed three pieces of copper tubing in the holes that we cut in the box in a shape of a "z".
5.) We cut small pieces of the plastic tubing and connected them to the copper tubing. To prevent leakage, we placed clay on the places where the plastic and copper met.
6.) We covered the top of the shoebox in a sheet of saran wrap to create a greenhouse effect, and the lid of the shoebox in a sheet of aluminum foil to reflect the light of the sun on the tubing.
7.) We taped the lid at a 68 degree angle, so it was tilted towards the sun.
After testing our heater, my group found out that we gained 12 degrees from our initial temperature, which was very surprising. Our design's heat gain was a total of 6,279 Joules.
SOLAR ANGLES
This was the next thing that we learned. Everyone in our class knew that the sun changed positions throughout the day, depending on what time it was. But for the majority of us, it was new information that the sun changed its height in the sky during different seasons due to the earth's tilt. The sun is lower in the sky during the winter than it is in the summer. That is why the sun and its light are "weaker" during the colder months. On the left is a chart showing the sun's movements.
DAYLIGHTING DESIGN ACTIVITY
In this project, we learned about different ways to get light without electricity in a house. We had to design a 1,000 square ft. house using at least one of each of the following daylighting techniques:
1.) Skylights~ skylights are like giant windows on the roof of a house.This is an awesome technique to get lots of light in a room, especially at noon, when the sun is in the middle of the sky.
2.) Light Shelves~ these look like shelves on a window, and they reflect and distribute light from outside to the home's ceiling. They also are good at reducing glare.
3.) Clerestory Windows~ clerestory windows are placed high up on the side of a wall, and is good at catching light in the morning, or just before sunset.
4.) Solar Tubes~ these are giant tubes/pipes placed into a roof onto the home's ceiling. It catches natural light and distributes it around the room. It is made of reflective material for this reason.
We first designed a house with 60-watt light bulbs and decided how many to put in each room in our house, and how often they were on. We calculated the energy consumption, and found that we used 23 bulbs total with an average of 19 hours per day of operation. The total energy consumption was 8.28 kilowatts per hour.
We then designed a to-scale model of a house (mentioned above) with no use of light bulbs, but with the use of the daylighting techniques mentioned above and pictured below. After testing it, we decided to still have bulbs, but with a minimal amount. We came up with the use of 15 bulbs, with an average of 14 hours per day of operation. We got an energy consumption of 6.21 kilowatts per hour, which was 2.07 kilowatts per hours less than before.
Below is a picture of our house, and of all the daylighting examples.
Clerestory Windows
Light Shelf
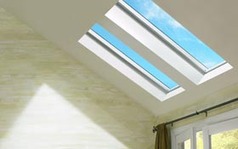
Skylight
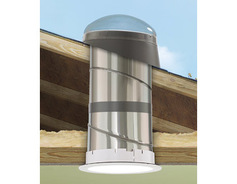
Solar Tube
SITE SELECTION
In this project, we had to take data on at least three sites on the San Marin campus. We had to rank the selected sites from a scale; my group did it from 1-3 (one being the least efficient, two being average, and three being awesome/ efficient in every way). The site that was thought the most efficient, we would build our structure [our house(above)] on. Here is what my group and I ranked the three sites we selected on, and beside them are our ratings for the site we chose to build on:
1.) Space~3 6.) Noise (not a lot of it)~2
2.) Accessibility~2 7.) Visibility (not too hidden)~2
3.) Sun/Shade~2 8.) View/Elevation~2
4.) The sun throughout the day (plentiful)~3 9.) Disruption to others~2
5.) Privacy~2 10.) Temperature (too hot/cold)~2
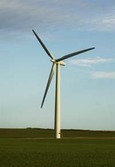 HAWT
HAWT
MATERIALS TESTING LAB
For this project, we had to design and conduct an experiment and test possible materials for our "big project", which I will mention soon below. We were trying to find which materials were the best and most effective conductors of heat, insulation, and absorbing/sustaining heat. We placed the materials tested on a strip of cardboard to insulate from the countertop, and hung a 60 watt incandescent bulb 12 centimeters above the material. We took the temperature of the objects every five minutes for twenty minutes with the bulb on, and did the same with the lightbulb off, to see if they absorbed heat and were able to hold it. We tested the following materials:
~sand ~rubber
~dirt ~terra cotta
~water ~white paint
~brick ~yellow paint
~aluminum ~green paint
~copper ~black paint
~steel ~magnetic paint
~nails ~glass
~screws ~saran wrap
~plywood(thin) ~2 layers of saran wrap
~plywood(thick) ~rigid foam
~OSB ~spray foam
~2x4 ~fiberglass
~tar paper
WIND TURBINE LAB
In this lab, we had to design and build a turbine powered by wind to generate the electricity needed for our house. We studied two different types of turbines: VAWT (Vertical Axis Wind Turbine) and HAWT (Horizontal Axis Wind Turbine). We learned that HAWTs were more common, and were easier to use, because the wind is pushing them from only one direction. VAWTs, on the other hand, were more inconvenient due to the way their blades spin horizontally. This makes the wind push them on two sides, making it hard for the VAWT to start moving.
COLD FRAME & REFLECTOR
All the projects above eventually led to this project: our building design. We had to build a cold frame to allow plant growth during the winter for the San Marin garden, and design a reflector for the north window on the passive solar home that the 2017 STEM class built last year. After designing them, we had to create a scale model of them[the designs] and explain the key features, list the materials and why we chose them, their costs and the source links, and create blueprints. Here are both of the presentations:
REFLECTION
Though this project was very long, I really felt like my group and I did very well. We all did our best to contribute to the project, and worked very hard to make it as perfect as we could. Everyone was focused (though there were some times when we all weren't), and everyone helped each other if another needed help. There were a few things I felt that we could improve on. One was time management. We did very well with this for our "mini" projects leading to the cold frame and reflector, but when we did get to the "big" project, I felt that we spent more time on the cold frame than the reflector, making us a little behind. Another "pit" was that we didn't always consult with each other information that we needed. In other words, there was a slight lack of communication. In preparation for the presentation, I felt like we could have communicated the individual information we found to everyone else, so everyone could explain something that they weren't necessarily familiar on.
I felt like I also improved on a few life skills while we did this project. I was able to improve on my patience. When a few members of my group were getting off task, I was able to take a deep breath, and calmly remind my group to finish what they were doing. Everyone would then get back on task without any conflict. I also felt like I was able to improve my leadership skills. In previous projects, I would give inputs on ideas, and share a few of my own. I would help the leader, and be like "the second in command". For this project, though, I felt like I was able to step it up, and I took control of some of the project. I felt very confident in our work, and I felt like overall my group and I did a good job.
CONCEPTS
Heat~ a form of thermal energy, usually from light; the measure of movement in molecules (more heat=more movement)
Radiation~ the transfer of heat through waves/particles/rays (sunlight)
Conduction~ the transfer of heat through solids (pan on a stove)
Convection~ the transfer of heat through a fluid (liquids/gases)
Insulation~ the opposite of conduction; a resistance to transferring heat, holds heat
Absorb~ to take in and hold energy
Reflect~ when light is neither absorbed or transmitted to another substance, but is bounced directly off of it.
Temperature~ the property that tells you whether they have heat or not (hot or cold)
Thermodynamics~ 0th law.) explains temperature "if two systems are in thermal equilibrium with a third system, then they are in equilibrium with each other 1st law.) the conservation of energy "energy is neither created or destroyed; heat is a form of energy" 2nd law.) entropy increases "disorder increases; over time, everything becomes the same temperature" 3rd law.) temperature can never get to absolute zero "heat always exists"
Specific Heat~ a constant for a substance, measures how slowly an object heats up; how well it holds heat high specific heat- warms up slowly and holds heat well
Pressure~ force per unit area; the greater the area, the more pressure (the deeper the water, the more pressure)
Buoyancy~ the weight of water after it's displaced; when an object is submerged in water, the upward force is the opposite of gravity and is called the buoyant force.
Thermal Conductivity~ the rate at which a material transfers heat
Thermal Resistance~ the ability of material to resist transferring heat
Evaporation~ the cooling process that takes heat from water, and cools water down
Archimede's Principle~ an immersed object is buoyed up by a force equal to the weight of the fluid it displaces (boat weighs 10,000 lbs, displaces 10,000 lbs of water)
Bernoulli's Principle~ if a speed of a fluid increases, the pressure decreases
